Creating a Hit Points (HP) Indicator in DarkGDK
HP indicators are normally used in Adventure games to show the character’s present HP level. There are several ways to create an HP level indicator in DarkGDK but the easiest way (I guess) is to create a sprite sheet with three or more columns and with different HP numbers per column. For instance, three HP’s on the first column, two on the second and one on the last. If a character dies, display the appropriate column relative to the character’s HP level. This method can also be used to specify the remaining number of bullets left or the character’s current energy level. If you are confused, follow these steps:
1. Start Microsoft Visual 2008 C++ Express Edition.
2. Click File>New Project>Select the Wizards Project type>Select Dark GDK-2d Game from the Visual Studio installed templates.
3. Click View>Solution Explorer. Double-click main.cpp. The following should then appear:
 6. Later on we will be dividing this image into three columns. If you noticed if we divide this image into three divisions each divisions we will have different number of HP’s.
 7. Copy this image from whatever location you have saved it. In this example, I have saved it on my desktop so all I need to do is go to the desktop. Select the file “hplevel.bmp”. Then press CTRL + C to copy it.
8. Switch to Micorsoft Visual C++ 2008 DarkGDK to view our game again then click the Open File icon from the formatting toolbar. 9. This causes the Open File dialog box to appear. Click on the empty pane>Press Ctrl + V to paste our “hplevel.bmp” file.
 10. The next thing that you’ll need to do is to load this image into the computer’s memory, and divide it into three columns. We can do so by using the dbCreateAnimatedSprite command. Click the cancel button from the open dialog box to close it. This causes our code window to appear. Enter the ff. after the dbSyncRate(60); line.

19. That’s all.
1. Start Microsoft Visual 2008 C++ Express Edition.
2. Click File>New Project>Select the Wizards Project type>Select Dark GDK-2d Game from the Visual Studio installed templates.
3. Click View>Solution Explorer. Double-click main.cpp. The following should then appear:
// Dark GDK - The Game Creators - www.thegamecreators.com

// the wizard has created a very simple 2D project that uses Dark GDK
// it can be used as a starting point in making your own 2D games

// whenever using Dark GDK you must ensure you include the header file
#include "DarkGDK.h"

// the main entry point for the application is this function
void DarkGDK ( void )
{
// in this application a backdrop is loaded and then several
// animated sprites are displayed on screen

// when starting a Dark GDK program it is useful to set global
// application properties, we begin by turning the sync rate on,
// this means we control when the screen is updated, we also set
// the maximum rate to 60 which means the maximum frame rate will
// be set at 60 frames per second
dbSyncOn   ( );
dbSyncRate ( 60 );

// a call is made to this function so we can stop the GDK from
// responding to the escape key, we can then add in some code in our
// main loop so we can control what happens when the escape key is pressed
dbDisableEscapeKey ( );

// now we will set the random seed value to the timer, this will
// help us to get more random values each time we run the program
dbRandomize ( dbTimer ( ) );

// we are going to display a backdrop for the scene, to do this
// we load our image and give it an ID number of 1, this particular
// image is of a sky at night with stars
dbLoadImage ( "backdrop.bmp", 1 );

// the next step is to create a sprite that uses this image, this
// is achieved by calling dbSprite and passing in a value of 1 for the
// sprites ID, 0 for the X coordinate, 0 for the Y coordinates and a
// value of 1 for the image
dbSprite ( 1, 0, 0, 1 );

// next we will load in some animated sprites, before doing this
// we need to adjust the image color key, by using this function we
// can make a specific color be transparent, in our case we want this
// to be bright pink
dbSetImageColorKey ( 255, 0, 255 );

// in this loop we're going to create some animated sprites, the image
// we load contains frames of animation for an asteroid
for ( int i = 2; i < 30; i++ )
 {
  // create an animated sprite and give it the ID number from the
  // variable i, next is the filename, now we come to how many frames
  // across and down, in our case this is 4, finally we come to the image
  // ID that the sprite will use, again we use i
  dbCreateAnimatedSprite ( i, "sprite.bmp", 4, 4, i );

  // position our sprite at a random location
  dbSprite ( i, dbRnd ( 640 ), -dbRnd ( 1500 ), i );
 }

 // now we come to our main loop, we call LoopGDK so some internal
 // work can be carried out by the GDK
 while ( LoopGDK ( ) )
 {
  // run a loop through all our sprites
  for ( int i = 2; i < 30; i++ )
  {
   // move the sprite down and play its animation
   // moving from frame 1 to 16 with a delay of 60 ms
   dbMoveSprite ( i, -2 );
   dbPlaySprite ( i, 1, 16, 60 );

   // check the position of the sprite, if it has gone off scren
   // then reposition it back to the top
   if ( dbSpriteY ( i ) > 500 )
dbSprite ( i, dbRnd ( 640 ), -dbRnd ( 1500 ), i );
}

// here we check if the escape key has been pressed, when it has
// we will break out of the loop
if ( dbEscapeKey ( ) )
break;

// here we make a call to update the contents of the screen
dbSync ( );
}

// when the user presses escape the code will break out to this location
// and we can free up any previously allocated resources

// delete all the sprites
for ( int i = 1; i < 30; i++ )
  dbDeleteSprite ( i );

 // delete the backdrop image
 dbDeleteImage ( 1 );

 // and now everything is ready to return back to Windows
 return;
}
4. Since we intend to make our sample application from the scratch, delete all the pre-made codes, except the following:
// Dark GDK - The Game Creators - www.thegamecreators.com
#include "DarkGDK.h"

// the main entry point for the application is this function
void DarkGDK ( void )
{

 dbSyncOn   ( );
 dbSyncRate ( 60 );


 while ( LoopGDK ( ) )
 {


  // here we make a call to update the contents of the screen
  dbSync ( );
 }

}
5. Make a spritesheet using gimp or photoshop. In this example we will be using the following image:
6. Later on we will be dividing this image into three columns. If you noticed if we divide this image into three divisions each divisions we will have different number of HP’s.
7. Copy this image from whatever location you have saved it. In this example, I have saved it on my desktop so all I need to do is go to the desktop. Select the file “hplevel.bmp”. Then press CTRL + C to copy it.
8. Switch to Micorsoft Visual C++ 2008 DarkGDK to view our game again then click the Open File icon from the formatting toolbar.
9. This causes the Open File dialog box to appear. Click on the empty pane>Press Ctrl + V to paste our “hplevel.bmp” file.
10. The next thing that you’ll need to do is to load this image into the computer’s memory, and divide it into three columns. We can do so by using the dbCreateAnimatedSprite command. Click the cancel button from the open dialog box to close it. This causes our code window to appear. Enter the ff. after the dbSyncRate(60); line.
//divides the image into 3 columns
dbCreateAnimatedSprite(1,"hplevel.bmp",3,1,1);
11. If you run your application now, it will just display a blue screen. To display your animated sprite,use the dbSprite command. Enter the following code after the dbCreateAnimatedSprite line.
//displays our animated sprite
dbSprite(1,0,0,1);
12. Press Ctrl+ F5 to test our application again. If you noticed the first column of our animated sprite is shown together with a white background. To clear the white background, use the dbSetImageColorKey command. Enter the following before the dbCreateAnimated line:
//clears the white background
dbSetImageColorKey(255,255,255);
13. Your code should now look like this:
// Dark GDK - The Game Creators - www.thegamecreators.com
#include "DarkGDK.h"

// the main entry point for the application is this function
void DarkGDK ( void )
{

dbSyncOn   ( );
dbSyncRate ( 60 );
//clears the white background
dbSetImageColorKey(dbRgb(255,255,255));
//divides the image into 3 columns
dbCreateAnimatedSprite(1,"hplevel.bmp",3,1,1);
//displays our animated sprite
dbSprite(1,0,0,1);


while ( LoopGDK ( ) )
{


// here we make a call to update the contents of the screen
dbSync ( );
}

}
14. The next thing that we want to do is to subtract the number of HP’s everytime the space key is pressed. Of course you can replace this with more advanced algorithms such as when your player dies or when a shot is fired, etc. But for the sake of simplicity, lets just go with the space key(hehehe).
15. Declare an integer variable named intspritesheetcols just below #include "DarkGDK.h" line and assign a a default value 1.
16. Enter the following after the while ( LoopGDK ( ) ){
//you can replace dbSpaceKey with  "if a player dies" or "if a gun is fired" algorithms
if (dbSpaceKey())
{
//increment the value of intspritesheetcols by 1
//if you recall we've initially assigned a starting value 1 to
//our intspritesheetcols variable. If you press the
//the space key for the first time it will be incremented by 1
intspritesheetcols=intspritesheetcols + 1;
//displays the spritesheet division relative to the specified
//intspritesheetcols value. The first time you press the space key
//intspritescols will have a value to causing the second column
//of our spritesheet to be displayed
dbSetSpriteFrame(1,intspritesheetcols);
//displays our sprite
dbSprite(1,0,0,1);
}
//if the number of columns exceeds 3
//you can display your game over screen here but in this case let's
//just exit the game
if(intspritesheetcols>3)
{
return;
}
17. Your whole code should now look like this:
// Dark GDK - The Game Creators - www.thegamecreators.com
#include "DarkGDK.h"
int intspritesheetcols=1;
// the main entry point for the application is this function
void DarkGDK ( void )
{

dbSyncOn   ( );
dbSyncRate(5);
//clears the white background
dbSetImageColorKey(255,255,255);
//divides the image into 3 columns
dbCreateAnimatedSprite(1,"hplevel.bmp",3,1,1);
//displays our animated sprite
dbSprite(1,0,0,1);

while ( LoopGDK ( ) )
{
//you can replace dbSpaceKey with  "if a player dies" or "if a gun is fired" algorithms
if (dbSpaceKey())
{
//increment the value of intspritesheetcols by 1
//if you recall we've initially assigned a starting value 1 to
//our intspritesheetcols variable. If you press the
//the space key for the first time it will be incremented by 1
intspritesheetcols=intspritesheetcols + 1;
//displays the spritesheet division relative to the specified
//intspritesheetcols value. The first time you press the space key
//intspritescols will have a value to causing the second column
//of our spritesheet to be displayed
dbSetSpriteFrame(1,intspritesheetcols);
//displays our sprite
dbSprite(1,0,0,1);
}
//if the number of columns exceeds 3
//you can display your game over screen here but in this case let's
//just exit the game
if(intspritesheetcols>3)
{
return;
}
// here we make a call to update the contents of the screen
dbSync ( );
}

}
18. Press CTRL + F5 to run your application. You should now see an output similar to the following:
19. That’s all.
Blender 2.5 Beta Boids Particle System
Boids particle system is used to emulate the movements of animals moving in clusters or groups. To create a simple boids simulation in Blender 3d 2.5 Beta, follow these steps:
1. Start Blender by clicking on Start>All Programs>Blender Foundation>Blender>Blender.
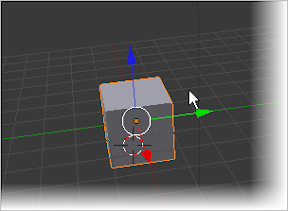
2. Press Esc to get rid of the Splash screen then select the default cube by right-clicking it.
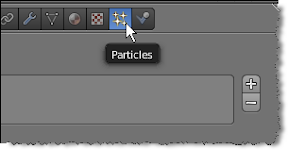
3. Click the particles button in the Properties View (formerly known as Buttons Window).
4. Click the + (add particles) button.

5. Blender will automatically create a particle system named “ParticleSystem”. Locate the Physics category by scrolling the scrollbar down> Then click the boids button.

6. At this point you can press Alt+A to test our animation.If you noticed, our simulation does not would do that much because what we have done so far is to create the cube object as a source or emitter of our boids particles.
7. The next thing that we need to do is to add an object that will serve as destination or goal of our boids particles. To do that, position the 3d cursor a few blender units away from our cube object.

8. Press Shift + A>Mesh>Icosphere.
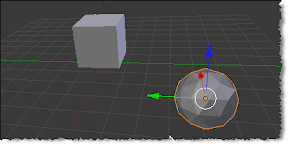
9. You can add any object you want as a destination of our boids particles but in this case we’ve used an icosphere as our goal object(no reason in particular). Select the icosphere by right-clicking on it>Click the Physics button from the Properties View.

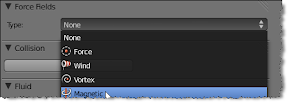
10. Locate the Force Field category. Select Magnetic from the type listbox.
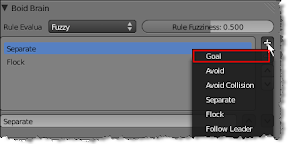
11. Select your cube object by right-clicking on it>Click the particles button> Locate the Boid Brain Category>Click the +(Add Rule) button>Select Goal.
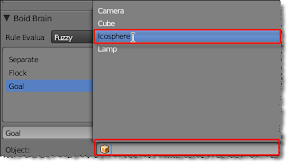
12. Click the Goal object textbox> Select icosphere.
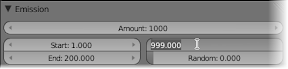
13. Press Alt+A to test your animation. If you noticed our boids particles seemed to be moving in the direction of our destination object (icosphere). Unfortunately it does not actually reached the icosphere because it dies after 50 frames. To increase the boids life, right-click the cube object>Click the Particles button. In the emission category, change its Lifetime value to 999.000.
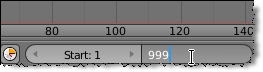
14. You can change whatever particles lifetime value you like just make sure that it is identical to the ending frame of our animation. To change the ending frame of our animation, locate the End option in the timeline then change it to 999.
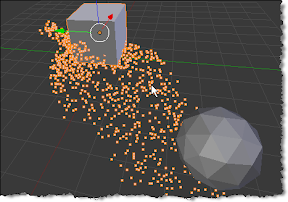
15. Press Alt + A to test your animation. You should now see an output similar to the following.
1. Start Blender by clicking on Start>All Programs>Blender Foundation>Blender>Blender.
2. Press Esc to get rid of the Splash screen then select the default cube by right-clicking it.
3. Click the particles button in the Properties View (formerly known as Buttons Window).
4. Click the + (add particles) button.
5. Blender will automatically create a particle system named “ParticleSystem”. Locate the Physics category by scrolling the scrollbar down> Then click the boids button.
6. At this point you can press Alt+A to test our animation.If you noticed, our simulation does not would do that much because what we have done so far is to create the cube object as a source or emitter of our boids particles.
7. The next thing that we need to do is to add an object that will serve as destination or goal of our boids particles. To do that, position the 3d cursor a few blender units away from our cube object.
8. Press Shift + A>Mesh>Icosphere.
9. You can add any object you want as a destination of our boids particles but in this case we’ve used an icosphere as our goal object(no reason in particular). Select the icosphere by right-clicking on it>Click the Physics button from the Properties View.
10. Locate the Force Field category. Select Magnetic from the type listbox.
11. Select your cube object by right-clicking on it>Click the particles button> Locate the Boid Brain Category>Click the +(Add Rule) button>Select Goal.
12. Click the Goal object textbox> Select icosphere.
13. Press Alt+A to test your animation. If you noticed our boids particles seemed to be moving in the direction of our destination object (icosphere). Unfortunately it does not actually reached the icosphere because it dies after 50 frames. To increase the boids life, right-click the cube object>Click the Particles button. In the emission category, change its Lifetime value to 999.000.
14. You can change whatever particles lifetime value you like just make sure that it is identical to the ending frame of our animation. To change the ending frame of our animation, locate the End option in the timeline then change it to 999.
15. Press Alt + A to test your animation. You should now see an output similar to the following.
Display Record Values from Two Tables in ASP.net Visual Web Developer Express Edition
To display data from two tables in ASP.net, we’ll need two tables with one or more identical fields. One field should act as a primary key on one table and the other should act as a foreign key or normal key on the other table. For the sake of example, let’s make two tables tblStudents and tblBooks using the following structures:
a. tblStudents
b. tblBooks
1. Start Visual Web Developer Express Edition.
2. Click File>New Website>Select Asp.net website from Visual Studio Installed Templates options>Click Ok.
3. Click View>Solution Explorer>Right-click App_Data from the solution Explorer>Add New Item>Select SQL Server Database from Visual Studio Installed templates options>Accept the default database.mdf name>Click Add.

4. The Database Explorer panel will then come into view. To create a new table>Right-click Tables from the database explorer panel>Select Add new table.

Enter the following column names, use chrstudid as a primary key:

5. Click the close(x) button when done. You will be prompted if you wanted to saves changes to the table, just Click the Yes button>Enter “tblStudents” in the Enter a name for the table textbox>Click Ok.
6. Click the + icon beside the Tables node in the database Explorer>Right-click tblStudents>Click Show Table Data.

Enter the following values:
7. Right-click Tables from the Database Explorer again then Select Add New Table.

Enter the following Column names using chrbookid as a primary key:

8. Click the close(x) button when done. You will be prompted if you wanted to saves changes to the table, just Click the Yes button>Enter “tblBooks” in the Enter a name for the table textbox>Click Ok.
9. Click the + icon beside the Tables node in the database Explorer>Right-click tblBooks>Click Show Table Data.

Enter the following values:

10. Click View Solution Explorer > Double-Click Default.aspx> Double-click the design button>Expand the Data category of the toolbox>Click and drag a SqlDataSource control to the Outline Designer window.

11. Click the configure data source link>Select Database.Mdf from the “Which data connection should your application use to connect to the database?” listbox>Next.
12. Click the Specify a custom SQL statement or stored procedure radio button>Next.
13. Click the SELECT tab then enter the following SQL statements in the SQL Statement textarea:

14. This statement retrieves the values of our specified column names from both tables. If you noticed, we’ve added tblStudents dot chrstudid to specify that the values should be retrieve from the tblStudents table since tblBooks table also has chrstudid.Moreover, we’ve added INNER JOIN to join our tables using a common field
due to the fact that chrbookid, chrtitle, and chrauthor exists on the other table.
15. Click next. You can click the test query button to preview the result then click the finish button.
16. Click a grid view control from the data category of the toolbox then drag it onto the Outline Designer. Select the name of your SQLDataSource from the gridview’s Choose Data Source List Box.

16. Press CTRL + F5 to test your application.
17. You should now see an output similar to the following screenshot:

a. tblStudents
| Column Name | Data Type |
| chrstudid | nchar(10) |
| chrstudfname | nchar(20 |
| chrstudlnam | nchar(20) |
b. tblBooks
| Column Name | Data Type |
| chrbookid | nchar(10) |
| chrtitle | nchar(30 |
| chrauthor | nchar(30) |
| chrstudid | nchar(10) |
1. Start Visual Web Developer Express Edition.
2. Click File>New Website>Select Asp.net website from Visual Studio Installed Templates options>Click Ok.
3. Click View>Solution Explorer>Right-click App_Data from the solution Explorer>Add New Item>Select SQL Server Database from Visual Studio Installed templates options>Accept the default database.mdf name>Click Add.
4. The Database Explorer panel will then come into view. To create a new table>Right-click Tables from the database explorer panel>Select Add new table.
Enter the following column names, use chrstudid as a primary key:
5. Click the close(x) button when done. You will be prompted if you wanted to saves changes to the table, just Click the Yes button>Enter “tblStudents” in the Enter a name for the table textbox>Click Ok.
6. Click the + icon beside the Tables node in the database Explorer>Right-click tblStudents>Click Show Table Data.
Enter the following values:
7. Right-click Tables from the Database Explorer again then Select Add New Table.
Enter the following Column names using chrbookid as a primary key:
8. Click the close(x) button when done. You will be prompted if you wanted to saves changes to the table, just Click the Yes button>Enter “tblBooks” in the Enter a name for the table textbox>Click Ok.
9. Click the + icon beside the Tables node in the database Explorer>Right-click tblBooks>Click Show Table Data.
Enter the following values:
10. Click View Solution Explorer > Double-Click Default.aspx> Double-click the design button>Expand the Data category of the toolbox>Click and drag a SqlDataSource control to the Outline Designer window.
11. Click the configure data source link>Select Database.Mdf from the “Which data connection should your application use to connect to the database?” listbox>Next.
12. Click the Specify a custom SQL statement or stored procedure radio button>Next.
13. Click the SELECT tab then enter the following SQL statements in the SQL Statement textarea:
14. This statement retrieves the values of our specified column names from both tables. If you noticed, we’ve added tblStudents dot chrstudid to specify that the values should be retrieve from the tblStudents table since tblBooks table also has chrstudid.Moreover, we’ve added INNER JOIN to join our tables using a common field
due to the fact that chrbookid, chrtitle, and chrauthor exists on the other table.
15. Click next. You can click the test query button to preview the result then click the finish button.
16. Click a grid view control from the data category of the toolbox then drag it onto the Outline Designer. Select the name of your SQLDataSource from the gridview’s Choose Data Source List Box.
16. Press CTRL + F5 to test your application.
17. You should now see an output similar to the following screenshot:
Example 18: Race to Ten Text-Based Game
Problem: Make a simple Race to Ten text-based game. The details of the game is shown in the following screenshot:

Code:
Code:
// Learn more about F# at http://fsharp.net
open System
//change the console title
System.Console.Title<-"Race to Ten"
//adds the foreground and background color
System.Console.ForegroundColor<-ConsoleColor.DarkBlue
System.Console.BackgroundColor<-ConsoleColor.Gray
//clears the screen. This is to apply the background color once the
//console application is loaded
System.Console.Clear()
//display the game title screen
printfn "\t\t\t\tRace to Ten"
printfn "\n\n\n\n\n\n\n\n\n\n\n\n\n\n\n\n\n\n\t\t\tPress any key to continue..."
System.Console.ReadLine()|>ignore
System.Console.Clear()
//display the game description screen
printfn "Instructions:"
printfn "In this game, each player(you vs. the computer) enters a number between 1 to 3"
printfn "The previously inputted number will be added to the present number"
printfn "The first player to enter a number that adds up to 10 wins the game"
printfn "Press Esc to quit the game"
printfn "\n\n\n\n\n\n\n\n\n\n\n\n\n\n\n\n\n\n\t\t\tPress any key to continue..."

let mutable userkey=System.Console.ReadLine()
System.Console.Clear()
//declares our variables
let rndnum=new Random()
let mutable intsum=0
let mutable intusernum=0
let mutable intremain=0
//loop while sum is not equal to 10 and
//the spacebar key has been pressed
while (intsum < 10 ) do
//computer generates a number
        printfn "\n\nAI's turn..."
        let intainum=rndnum.Next(1,3)
        printfn "AI num: %d" intainum
//accumulates the number to the
//value of sum
        intsum<-intsum + intainum
        printfn "\n\n\n\n\n\n\n\n\n\n\n\n\n\n\n\n\n\n\t\t\tPress any key to continue...Esc to quit"
        System.Console.ReadLine()|>ignore
System.Console.Clear()
//display how many numbers more to go
//before 10
intremain<-intsum-10
        printfn "%d more to go!" intremain
 //if the sum is equal to 10
 //display "computer wins"
        if intsum>=10 then
System.Console.Clear()
//reset the value of sum so that
//the game will loop again
//remove intsum<-0 if you want the
 //game to end after one game
            printfn "Computer Wins!"
            intsum<-0
            printfn "\n\n\n\n\n\n\n\n\n\n\n\n\n\n\n\n\n\n\t\t\tPress any key to continue...Esc to quit"
            System.Console.ReadLine()|>ignore
System.Console.Clear()
//otherwise ask for a number
printfn "\n\nYour turn:"
intusernum<-(int)(System.Console.ReadLine())
 //if the number exceeds 3 then
 //ask for a number again
        if intusernum>3 then
printfn "Number must be between 1 to 3"
printfn "You turn:"
intusernum<-(int)(System.Console.ReadLine())
            intsum<-intsum + intusernum
            System.Console.Clear()
//accumulates the inputted number to the value of sum
        intsum<-intsum + intusernum
        intremain<-intsum-10
        printfn "%d more to go!" intremain
        if intsum>=10 then
System.Console.Clear()
printfn "You Win!"
intsum<-0
            printfn "\n\n\n\n\n\n\n\n\n\n\n\n\n\n\n\n\n\n\t\t\tPress any key to continue...Esc to quit"
            System.Console.ReadLine()|>ignore
System.Console.Clear()
Example#17(Array.Iter)
Problem: Make a console application that will convert the following singular nouns to plural. Use Array.Iter:
1. ally
2. army
3. baby
4. lady
5. navy
This will display the following output:

1. ally
2. army
3. baby
4. lady
5. navy
// Learn more about F# at http://fsharp.net
open System
//change the console title
System.Console.Title<-"Convert to Plural"
//adds the foreground and background color
System.Console.ForegroundColor<-ConsoleColor.Blue
System.Console.BackgroundColor<-ConsoleColor.White
//clears the screen. This is to apply the background color once the
//console application is loaded
System.Console.Clear()
//assigns the singular nouns to our array variable singularnouns
let singularnouns=[|"ally";"army";"baby";"lady";"navy"|]
printfn "Singular words:"
//iterates through the values of our singularnouns array variable
singularnouns|>Array.iter(fun singularwords->printfn "%s" singularwords)
printfn "Plural words:"
//iterates through the values of our singularnouns array variable
//replace the word in each array element from "y" to "ies"
singularnouns|>Array.iter(fun pluralnouns->
let pluralwords= pluralnouns.Replace("y","ies")
printfn "%s" pluralwords)
This will display the following output:
Subscribe to:
Posts (Atom)