Showing posts with label BlueJ. Show all posts

Simple GUI Calculator in Java

Hello world! I'm back. It’s been four years since my last post. I’d been very busy with work in these past few years that I haven’t had time to blog. I missed blogging somehow and this year I figure I’ll get back to blogging again.

We are going to be making simple programming projects starting from now and for our first project, let’s make a simplest calculator using Java. In this project we’ll be using BlueJ as our Java Development Tool.

1. Download BlueJ installer from https://www.bluej.org/ then install it.

2. Click Start>Click BlueJ.

3. Click Project>New Project>For the sake of example, let’s use Java as a project name.


4. Click New Class>Select Class in the class type radio buttons then enter Calc in the Class Name textbox.


5. Double-click the Calc object.


6. A Window containing default BlueJ source code will then appear. Press Ctrl + A to select all the codes, then Press Delete.


7. Enter the following code:

//imports the necessary packages.
//swing for frame, awt for controls, and event for button events
import javax.swing.*;
import java.awt.*;
import java.awt.event.*;
//creates a class named Calc and prepares it to accept an event
public class Calc extends JFrame implements ActionListener
{
//creates our controls
  JTextField ansTextField=new JTextField("",18);
  JButton oneButton=new JButton("1");
  JButton twoButton=new JButton("2");
  JButton plusButton=new JButton("+");
  JButton minusButton=new JButton("-");
  JButton equalsButton=new JButton("=");
 //declares three variables
  int intNum1,intNum2;
  String strOperator;
    public Calc()
{
   //creates two panels
   JPanel topPanel=new JPanel();
   JPanel bottomPanel=new JPanel();
   //create two layouts
   BorderLayout border=new BorderLayout(5,5);
   FlowLayout flow=new FlowLayout(FlowLayout.RIGHT,10,10);
   //apply the borderLayout to frame
   setLayout(border);
   //prepare our buttons to accept an event
   oneButton.addActionListener(this);
   twoButton.addActionListener(this);
   plusButton.addActionListener(this);
   minusButton.addActionListener(this);
   equalsButton.addActionListener(this);
   //adds the textbox to the top panel
   topPanel.add(ansTextField);
   //applies flow layout to bottom panel
   bottomPanel.setLayout(flow);
   //add the buttons to the bottom panel
   bottomPanel.add(oneButton);
   bottomPanel.add(twoButton);
   bottomPanel.add(plusButton);
   bottomPanel.add(minusButton);
   bottomPanel.add(equalsButton);
   add(topPanel,BorderLayout.NORTH);
   add(bottomPanel);
   //setup our frame
   setSize(200,200);
   setLocation(0,0);
   setDefaultCloseOperation(JFrame.EXIT_ON_CLOSE);
   setTitle("Calculator");
   setVisible(true);
 
}
public void actionPerformed(ActionEvent e)
{
    //getSource determines the name of the control that recieves an event
    Object source=e.getSource();
    //if the name of the control that recieves an event is oneButton, display 1 in the textfield
    if(source==oneButton)
    {
        ansTextField.setText(ansTextField.getText() + oneButton.getText());
    }
    //if the name of the control is twoButton, display 2 in the textfield
    //you can add else ifs for numbers 3 to 9. I just leave that to you to figure out
    else if(source==twoButton)
    {
         ansTextField.setText(ansTextField.getText() + twoButton.getText());
     
    }
    //if it is plusButton, get the value displayed in the textfield and place it
    //in a variable named intNum1
    //Store "+" in the strOperator variable then clear the text field
    else if(source==plusButton)
    {
        intNum1=Integer.parseInt(ansTextField.getText());
        strOperator="+";
        ansTextField.setText("");
        
    }
   //if it is minusButton, get the value displayed in the textfield and place it
   //in a variable named intNum1
   //store "-" in the strOperator variable then clear the text field
   else if(source==minusButton)
    {
        intNum1=Integer.parseInt(ansTextField.getText());
        strOperator="-";
        ansTextField.setText("");
        
    }
    //if the name of the control that recieves an event is equals button
    //get the current value of the text field and assign it as a value of intNum2
    //if the current value of strOperator is + add the two numbers, if it's value is -
    //subtract the two numbers
    else if(source==equalsButton)
    {
        intNum2=Integer.parseInt(ansTextField.getText());
        if(strOperator=="+")
        {
          ansTextField.setText(Integer.toString(intNum1 + intNum2)); 
        }
          if(strOperator=="-")
        {
          ansTextField.setText(Integer.toString(intNum1 - intNum2)); 
        }
        
    }
}
//Creates an instance of our class so that we can run it
public static void main(String[] args)
{
  Calc c=new Calc();  
}
}


8. Click the compile button.

9. Close the code window.

10. Right-click the class object>Select void main(String[] args) to run your application.


11. You should then see the following output:


You can use this and make a complete basic calculator. Of course I leave that to you to figure out. If you are having a hard time, you can download the source code here Good luck!

Connecting BlueJ GUI Application to a MySQL Workbench Database File

Hello friends! Am sure all of you newbie BlueJ user out there has probably been wondrin, “How the heck would I display my MySQL Workbench records in a BlueJ GUI application?”. Well, wonder no more because today we'll learn how to do it comprehensively.

Before we proceed to the actual step, I presume that you have a basic knowledge of developing GUI applications in BlueJ, JDBC API, and MySQL workbench. Let's proceed to the steps now shall way? I mean shall we?

1. Start MySQL workbench by clicking on Start>All Programs> MySQL>MySQL Workbench.

2. In the SQL Development pane, Double click Local instance MySql.


3. Click the “new sql tab for executing query” icon.


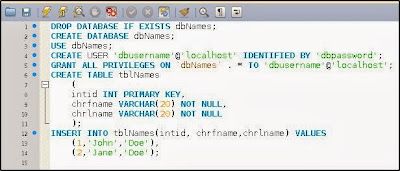
4. Enter the following MySQL script:


5. Click the “run everything” icon to execute the MySQL script.


What we have done so far is we've created a database file named dbNames and a user to that database named dbusername. We've also use dbpassword as our password. Additionally, we have a created a table named tblNames inside our dbNames database and added two records to it. What we are going to do next is we will create our Blue GUI application and then later on, we'll connect it to our database file.

6. Start BlueJ now by clicking on>BlueJ>BlueJ.

7. Click Project>New Project> Enter your desired project name>Create.

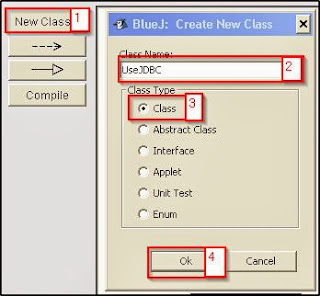
8. Click the New Class button>Enter “UseJDBC” as a class name no quotes. Use class as a class type then click OK.


9. Double-click the UseDBC class.


10. Press Control + A> then press Delete to delete all BlueJ's pre-written code, then enter the following codes:


/*imports the required packages*/
import javax.swing.*;
import java.awt.*;
import java.sql.*;
/*Creates a class named UseJDBC. extends JFrame means that UseJDBC is not just some class
it's also a Frame */
public class UseJDBC extends JFrame 
{
/* Create a container named ca.*/
Container ca=getContentPane();
/* Create a borderlayout which will be used later to position our panel1 
 on the north portion of the container*/
BorderLayout border=new BorderLayout(2,2);
/* Create a gridlayout with 3 rows and 2 columns. 
 Will be used to arrange our labels and textfields in a grid format*/
GridLayout grid=new GridLayout(3,2,1,1);
/*Create a panel named panel1. this is where we will add our controls later*/
JPanel panel1=new JPanel();
/*Creates our textboxes where we want o display our records later*/
JTextField IDtextbox=new JTextField();
JTextField Fnametextbox=new JTextField();
JTextField Lnametextbox=new JTextField();
public UseJDBC()
{
/*Applies the borderlayout to our container*/
ca.setLayout(border);
/*Applies the gridlayout to our panel*/
panel1.setLayout(grid);
/*Add our controls to the panel*/
panel1.add(new JLabel("ID:"));
panel1.add(IDtextbox);
panel1.add(new JLabel("Firstname:"));
panel1.add(Fnametextbox);
panel1.add(new JLabel("Lastname:"));
panel1.add(Lnametextbox);
/*Adds the panel to our container and position it to the north(top) 
 * portion of the container
 */
ca.add(panel1,BorderLayout.NORTH);
/*Setup our  frame*/
setContentPane(ca);
setSize(294,155);
setLocation(0,0);
setDefaultCloseOperation(JFrame.EXIT_ON_CLOSE);
setTitle("View Records");
setVisible(true);
        /* Creates a connection object named connectionobj*/
        Connection connectionobj;
        try {
        /*Creates a new instance of our jdbc driver*/
        Class.forName("com.mysql.jdbc.Driver").newInstance();
        /*Connect to our database named dbNames using the
        username dbusername and password dbpassword*/
        connectionobj =   DriverManager.getConnection( "jdbc:mysql://localhost:3306/dbNames","dbusername","dbpassword");
        /*Create a statement object named statementobj*/
        Statement statementobj = connectionobj.createStatement() ;
        /*Specify how we want to retrieve the record from MySQL Workbench
         * by using the executeQuery method of our statement object. Since we want all records from
         * all columns so we entered "Select * from tblNames" as a sql statement
         * The resultset will be stored in a variable named resultSet
         */
        ResultSet resultSet = statementobj.executeQuery( "SELECT * From tblNames" ) ;
        /*Points the record pointer to the first record*/
        resultSet.first( );
        /*Retrieve the values of each fieldname or columns and store it to our local variables*/
        String strid = Integer.toString(resultSet.getInt("intid"));
        String strfname = resultSet.getString("chrfname");
        String strlname = resultSet.getString("chrlname");
        /*Display our first records on their appropriate controls*/
        IDtextbox.setText(strid);
        Fnametextbox.setText(strfname);
        Lnametextbox.setText(strlname);
        /*Close the database connection*/
        connectionobj.close() ;
        } 
        catch (Exception e) 
        {
        }
}
/* Creates our main method*/
public static void main (String[] args)
{
UseJDBC UseJDBCinstance=new UseJDBC();
}
}


11. Before we run our application. Ensure that MySQL Connector J has been added to BlueJ's user library. There are two ways to do this:

a. Download mysql-connector-java-5.1.25-bin.jar from MySQL.org. Extract downloaded file then copy mysql-connector-java-5.1.25-bin.jar to C:\Program Files\BlueJ\lib\userlib.


b. Alternatively, in the BlueJ menu bar, click Options>Preferences>Libraries>Add>Locate and select your mysql-connector-java-5.1.25-bin.jar file>then click open.


12. Now that we have added MySQL connector-J to user libraries. Let's view our code once again and this time I've omitted the comments coz it's kinda messy or something.

import javax.swing.*;
import java.awt.*;
import java.sql.*;
public class UseJDBC extends JFrame 
{
Container ca=getContentPane();
BorderLayout border=new BorderLayout(2,2);
GridLayout grid=new GridLayout(3,2,1,1);
JPanel panel1=new JPanel();
JTextField IDtextbox=new JTextField();
JTextField Fnametextbox=new JTextField();
JTextField Lnametextbox=new JTextField();
public UseJDBC()
{
ca.setLayout(border);
panel1.setLayout(grid);
panel1.add(new JLabel("ID:"));
panel1.add(IDtextbox);
panel1.add(new JLabel("Firstname:"));
panel1.add(Fnametextbox);
panel1.add(new JLabel("Lastname:"));
panel1.add(Lnametextbox);
ca.add(panel1,BorderLayout.NORTH);
setContentPane(ca);
setSize(294,155);
setLocation(0,0);
setDefaultCloseOperation(JFrame.EXIT_ON_CLOSE);
setTitle("View Records");
setVisible(true);
        Connection connectionobj;
        try {
        Class.forName("com.mysql.jdbc.Driver").newInstance();
        connectionobj = DriverManager.getConnection( "jdbc:mysql://localhost:3306/dbNames","dbusername","dbpassword");
        Statement statementobj = connectionobj.createStatement() ;
        ResultSet resultSet = statementobj.executeQuery( "SELECT * From tblNames" ) ;
        resultSet.first( );
        String strid = Integer.toString(resultSet.getInt("intid"));
        String strfname = resultSet.getString("chrfname");
        String strlname = resultSet.getString("chrlname");
        IDtextbox.setText(strid);
        Fnametextbox.setText(strfname);
        Lnametextbox.setText(strlname);
        connectionobj.close() ;
        } 
        catch (Exception e) 
        {
        }
}
public static void main (String[] args)
{
UseJDBC UseJDBCinstance=new UseJDBC();
}
}


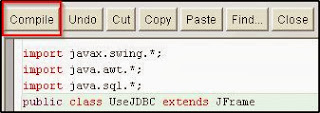
13. Click the compile button to convert our source code into byte code.


14. Click the close button on your source code window.

15. Right-click your UseJDBC class>Select void main string[] args>Ok.


16. You should now see the following output.


17. And that's all. Awesome right? Kiddin.

A simple “Hello World” program in BlueJ

1. Click Start>All Programs>BlueJ>BlueJ.
The BlueJ Environment will then come into view.

2. Click the Project menu>New project. In the Look in Listbox, select My documents> Enter “Example” (no quotes) in the Folder Name textbox then click Create.

3. Click the New Class button>Type “Hello” (no quotes) in the Class Name textbox> Ensure that Class is selected in the class type radio buttons then click OK.


A class icon with a caption “Hello” will then appear in the BlueJ workarea.


4.Double click the Hello class icon, the following source code window will then appear:


Before creating our “Hello World” program, let us first dissect the pre-made code bit by bit. If you noticed, I’ve enabled line numbers by clicking Options>Preferences>Display line numbers, for discussion purposes.

Line 8: Is the class declaration section. It simply tells the BlueJ compiler the name of our class and to create class file based on it.
Line 9: Indicates the beginning of our class.
Line 10-12: Is the instance variable declaration section. This is where we declare the variables that will be needed in our application.
Line 16-20: Is the variable initialization section. This is where we initialize the values of our variables.
Line 28-32: Is the method declaration section. This is where we specify the actions that our application is capable of performing.
Line 34: Simply specifies the end of our class.

5. Now that we’ve understood (somehow) Blue’s code structure, let us now make our hello world program. Go to the instance variable declaration section (Line 10-12) and change “private int x;” to “private String strtext;” no quotes. The reason why we are declaring a string variable instead of the default integer variable is because we will be storing text i.e. “Hello World” to this variable in the variable initialization section.


6. Go to the variable initialization section (Line 16 to 20) and assign a “Hello World” value to our previously declared variable. This can be done by erasing ‘x=0;’ and changing it to ‘strtext=”Hello World”;’.


7. Go to the method declaration section (Line 28-32). Since we will not be accepting a numeric value from other methods nor we will be passing numeric value, change :


To


8. Your code will now look like this:

/**
* Write a description of class Hello here.
* 
* @author (your name) 
* @version (a version number or a date)
*/
public class Hello
{
// instance variables - replace the example below with your own
private String strtext;

/**
* Constructor for objects of class Hello
*/
public Hello()
{
// initialise instance variables
strtext="Hello World";
}

/**
* An example of a method - replace this comment with your own
* 
* @param  y   a sample parameter for a method
* @return     the sum of x and y 
*/
public void sampleMethod()
{
//clears the previous outputs
System.out.println("\u000c");
//retrieves the value of the strtext variable and display it on the screen.
System.out.println(strtext);
}
}
9. Click the compile button to convert your Bluej source code into bytecode.

10. Click the Close Button.

11. Create an Object based on your Hello class by right-clicking the Hello class icon>new Hello.


12. Right-click the name of the Hello object>Click your method i.e., sampleMethod.


13. You should now see an output similar to the following: