Blender 2.5 Beta Boids Particle System

Boids particle system is used to emulate the movements of animals moving in clusters or groups. To create a simple boids simulation in Blender 3d 2.5 Beta, follow these steps:

1. Start Blender by clicking on Start>All Programs>Blender Foundation>Blender>Blender.

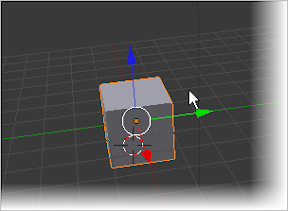
2. Press Esc to get rid of the Splash screen then select the default cube by right-clicking it.


3. Click the particles button in the Properties View (formerly known as Buttons Window).


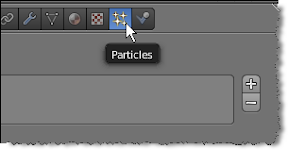
4. Click the + (add particles) button.


5. Blender will automatically create a particle system named “ParticleSystem”. Locate the Physics category by scrolling the scrollbar down> Then click the boids button.


6. At this point you can press Alt+A to test our animation.If you noticed, our simulation does not would do that much because what we have done so far is to create the cube object as a source or emitter of our boids particles.

7. The next thing that we need to do is to add an object that will serve as destination or goal of our boids particles. To do that, position the 3d cursor a few blender units away from our cube object.


8. Press Shift + A>Mesh>Icosphere.


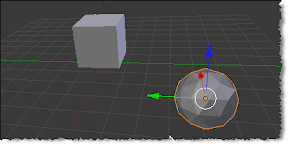
9. You can add any object you want as a destination of our boids particles but in this case we’ve used an icosphere as our goal object(no reason in particular). Select the icosphere by right-clicking on it>Click the Physics button from the Properties View.


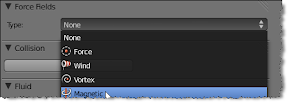
10. Locate the Force Field category. Select Magnetic from the type listbox.


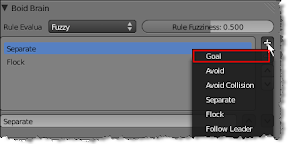
11. Select your cube object by right-clicking on it>Click the particles button> Locate the Boid Brain Category>Click the +(Add Rule) button>Select Goal.


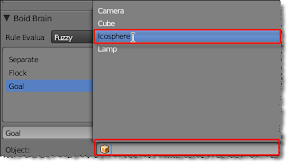
12. Click the Goal object textbox> Select icosphere.


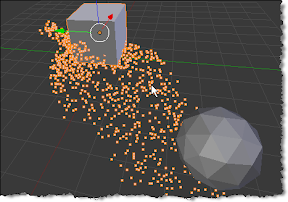
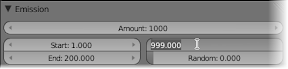
13. Press Alt+A to test your animation. If you noticed our boids particles seemed to be moving in the direction of our destination object (icosphere). Unfortunately it does not actually reached the icosphere because it dies after 50 frames. To increase the boids life, right-click the cube object>Click the Particles button. In the emission category, change its Lifetime value to 999.000.


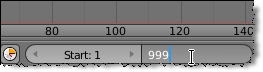
14. You can change whatever particles lifetime value you like just make sure that it is identical to the ending frame of our animation. To change the ending frame of our animation, locate the End option in the timeline then change it to 999.


15. Press Alt + A to test your animation. You should now see an output similar to the following.

Display Record Values from Two Tables in ASP.net Visual Web Developer Express Edition

To display data from two tables in ASP.net, we’ll need two tables with one or more identical fields. One field should act as a primary key on one table and the other should act as a foreign key or normal key on the other table. For the sake of example, let’s make two tables tblStudents and tblBooks using the following structures:

a. tblStudents
Column NameData Type
chrstudidnchar(10)
chrstudfnamenchar(20
chrstudlnamnchar(20)

b. tblBooks

Column NameData Type
chrbookidnchar(10)
chrtitlenchar(30
chrauthornchar(30)
chrstudidnchar(10)

1. Start Visual Web Developer Express Edition.

2. Click File>New Website>Select Asp.net website from Visual Studio Installed Templates options>Click Ok.

3. Click View>Solution Explorer>Right-click App_Data from the solution Explorer>Add New Item>Select SQL Server Database from Visual Studio Installed templates options>Accept the default database.mdf name>Click Add.


4. The Database Explorer panel will then come into view. To create a new table>Right-click Tables from the database explorer panel>Select Add new table.


Enter the following column names, use chrstudid as a primary key:


5. Click the close(x) button when done. You will be prompted if you wanted to saves changes to the table, just Click the Yes button>Enter “tblStudents” in the Enter a name for the table textbox>Click Ok.

6. Click the + icon beside the Tables node in the database Explorer>Right-click tblStudents>Click Show Table Data.


Enter the following values:


7. Right-click Tables from the Database Explorer again then Select Add New Table.


Enter the following Column names using chrbookid as a primary key:


8. Click the close(x) button when done. You will be prompted if you wanted to saves changes to the table, just Click the Yes button>Enter “tblBooks” in the Enter a name for the table textbox>Click Ok.

9. Click the + icon beside the Tables node in the database Explorer>Right-click tblBooks>Click Show Table Data.


Enter the following values:


10. Click View Solution Explorer > Double-Click Default.aspx> Double-click the design button>Expand the Data category of the toolbox>Click and drag a SqlDataSource control to the Outline Designer window.


11. Click the configure data source link>Select Database.Mdf from the “Which data connection should your application use to connect to the database?” listbox>Next.


12. Click the Specify a custom SQL statement or stored procedure radio button>Next.

13. Click the SELECT tab then enter the following SQL statements in the SQL Statement textarea:


14. This statement retrieves the values of our specified column names from both tables. If you noticed, we’ve added tblStudents dot chrstudid to specify that the values should be retrieve from the tblStudents table since tblBooks table also has chrstudid.Moreover, we’ve added INNER JOIN to join our tables using a common field
due to the fact that chrbookid, chrtitle, and chrauthor exists on the other table.


15. Click next. You can click the test query button to preview the result then click the finish button.

16. Click a grid view control from the data category of the toolbox then drag it onto the Outline Designer. Select the name of your SQLDataSource from the gridview’s Choose Data Source List Box.


16. Press CTRL + F5 to test your application.

17. You should now see an output similar to the following screenshot: