Retrieve values from another form in Visual FoxPro 9.0

One of the ways to retrieve values from another form in Visual Foxpro is to use a Form Set. A Form Set (from the name itself) is a set or collection of forms. To create a Form Set, follow these steps:

1. Click Start>All Programs>Visual FoxPro 9.0.
2. Close the Task Pane Manager Window.
3. To create a form, type CREA FORM in the command window, and then press enter.


Note: If the Command Window is not shown, Press CTRL + F2.
4. A new form will now come into view.


5. To create a form set, click Form>Create Form Set.


Although nothing appear to happen when you click the Create Form Set Submenu but essentially a new submenu will be enabled, the Add New Form submenu.

6. To add a form to your Form Set, Click Form>Add New Form.


A new form named form2 will now be added to your Form Set. If you add another form, that form will be named form3 and so on. Repeat the step no. 6 to add one more form to your form set. Our form set will now have 3 forms named form1, form2, and form3.


7. For the sake of example, let’s make an application that will allow us to enter our first name in the first form, last name in the second form, and display our first name and last name in the last form. We also want to display just the main form when our application is first executed and hide the unneeded forms.

8. If we click the Run icon or press control + E now. you’ll noticed that all forms are displayed at once.


8. Click all the close button of all the opened form to go back to the design view. To hide Form2 and Form3 when the application is first executed, double Click Form1, in the Init procedure, enter the following:
*hides the second form
Thisformset.Form2.Hide ()
*hides the third form
Thisformset.Form3.Hide ()


The code window will now look like this:


9. While still in the code window of Form1, Select the Unload event.

Enter the following code:

*Closes all the forms in the formset
 RELEASE Thisformset


The code window will now look like this:


10. Click the close button of the code window to save all codes that we have entered so far in form1.

11. Add a Label, a textbox and a button to form1, refer to the following screenshot for control property values:


12. What we aim to do here is if click the next button, form1 will be hidden and form2 will appear. To be able to do that, double click the Next button in form1 and enter the following codes:

*Hides form1
Thisformset.Form1.Hide()
*Show form2
Thisformset.Form2.Show()

The code window will now look like this:


Click the close button of the code window to save the codes that we have entered in Command1.

13. Add a Label, a textbox and two buttons to form2, refer to the following screenshot for control property values:


14. What we intend to do here is if we click the Prev Button, Form2 will be hidden and Form1 will be shown. If we click the Next Form3 will be shown and Form2 will be hidden.

15. Double click the Prev button then enter the following codes:
*Shows form1
Thisformset.form1.Show()
*Hides form2
Thisformset.form2.Hide()

Your code window will now look like this:


Click the close of the code window to save your codes

16. Double click the next button in form2 then enter the following codes:
*Hides form2
Thisformset.form2.Hide()
*Shows form3
Thisformset.form3.Show()

Your code window will now look like this:


Click the close of the code window to save your codes

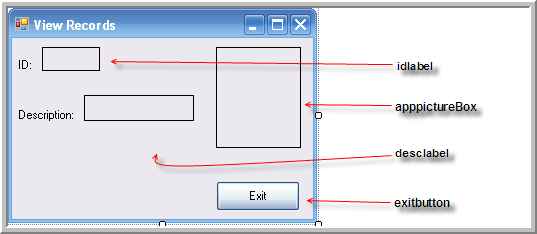
17. Add four labels to form3. Refer to the following screenshot for control property values:


18. What we intend to do here is if Form3 is loaded, all the values from the previous will be displayed on their respective controls. Double-click form3. Select the Activate procedure then enter the following codes:
*retrieves the value of the textbox in form1 and
*display it in the our label in form3
Thisformset.Form3.Label2.Caption=Thisformset.Form1.text1.value
*retrieves the value of the textbox in form2 and
*display it in our label in form3
Thisformset.Form3.Label4.Caption=Thisformset.Form2.text1.value

Your code window will now look like this:


19. Click the close button of the code window to save your codes. Let’s take a look to all our forms once more time.


20. Click the run icon or press Ctrl + E to test your Form Set.

21. Try entering your first name on form1>Next. Your Last name on Form2>Next. Your first name and last name should now appear on form3.

Symet BEAM Robot

Time for some break in programming and delve into the exciting world of robotics. Symet, FYI , is an intelligent agent that can sense it’s environment through the solar cell and perform an action (e.i. tweaks or rotates) the moment it senses heat. A perfect example of a simple AI robot. Here is a mobile video taken by Christine (one of my apprentice LOL) showing Symet at work. This was edited using PowerDirector( A rich-featured video editing software by Cyberlink) which is available for download at www.cyberlink.com. The title and PIP Templates were downloaded from directorzone.cyberlink.com. The Kinetic Typography was made using Microsoft PowerPoint.


Linking to an Ms-Access Data Source using Visual C++ 2008 Windows Forms Application

1.Create an Ms-Access database file using the following fields and data types:


2. Name your table as “tblApps” no quotes. Add appropriate record values for instance:


3. Name your Access database file as “dbICons” no quotes and save it in My documents. Make sure to close Ms-Access before you start Visual C++ 2008, otherwise you’ll get an “Already in use” error in the database connection part.

4. Click Start>All Programs>Microsoft C++ 2008 Express Edition.

5. Click File>New>Project>Select CLR from the Visual C++ Project Types tree view>Select Windows Forms Application from the Visual Studio installed templates pane>Enter your desired project name then click Ok.

6. Design your form as follows:


7. Just use the suggested control names above so that you will not get lost later on in this tutorial. To name a control, just select the control and change its name property value in the properties window.

8. At this moment we will now specify the name of our database that we wanted to connect to. To do that, click the Tools menu and select Connect to database:


9. Select Microsoft Access Database File (OLE DB) as a data source value then locate dbIcons and assign it as a Database filename value.


10. Click the oledbDataAdapter control from the general category of the toolbox and drag it to your form. There instances wherein the oledbdataadapter is not shown, to show it, click Tools>Choose Toolbox items>type “ole” not quotes in the filter textbox> then check everything that starts with “ole” then click the Ok button.

11. Once you have added an oledataadapter control, the data adapter configuration wizard will then come into view. If you noticed the table that you have connected previously (using step 8-9) is selected as a default value of the “what data connection should the data adapter use?” listbox. If not then click the listbox button then select “dbIcons” then click the Next button.


12. In the Choose a command type window, select the Use SQL statement radio button then click Next.

13. In the Generate SQL statement window, type “SELECT * FROM tblApps” no quotes in the blank pane then click Next>Finish.

14. Right-click>OleDbDataAdapter form the component tab>generate dataset>Ok.


15. Double-click your form then add the following in the Form_load event.
//Populates the dataset
this->oleDbDataAdapter1->Fill(this->dataSet11,"tblApps");
16. This will fill our dataset with record values from our database.

17. Bind the fieldname to an appropriate control using the following syntax:

this->objectname->databindings->add(gcnew Binding(“Property”, datasetname,”Tablename.fieldname”);

Add it below the oledbdataadapter.fill line. Your code should now look like this:

private: System::Void Form1_Load(System::Object^  sender, System::EventArgs^  e) {
//Populates the dataset
this->oleDbDataAdapter1->Fill(this->dataSet11,"tblApps");
//bind idlabel to the numappid fieldname
this->idlabel->DataBindings->Add(gcnew Binding("Text",this->dataSet11,"tblApps.numappid"));
//bind desclabel to the chrappdesc fieldname
this->desclabel->DataBindings->Add(gcnew Binding("Text",this->dataSet11,"tblApps.chrappdesc"));
//bind appPictureBox to the chriconurl fieldname
this->apppictureBox->DataBindings->Add(gcnew Binding("ImageLocation",this->dataSet11,"tblApps.chriconurl"));
}

18. Click the run icon to start debugging, you should see the following outputs: